|
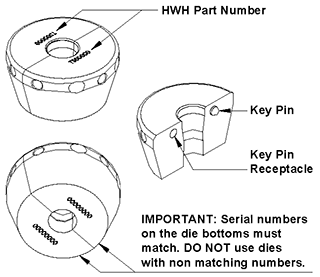
TO ORDER HOSE TOOLS/EQUIPMENT: MR751100_HOSE | TO ORDER HOSE & HOSE ENDS: MR220000 The current swaging tools will have TS44701 or TS52658 stamped into the side of the swaging tool. SEE PAGE 4. The current die sets have the HWH part number engraved into the top of each half of the die set. IMPORTANT: DO NOT use die sets that are not engraved with the HWH part number with a reconditioned swaging tool. Use of non-engraved die sets can permanently damage the swaging tool. This can result in leaking hose ends. IMPORTANT: DO NOT use ANY swaging equipment that is not marked with an HWH part number. Use of noncurrent swaging equipment can result in improper swaging of hose ends. This will result in leaking hose ends. STEP 1. Read the printing on the hose cover to determine which of the following hoses you have. Refer to SECTION 3 for complete swaging instructions. | |||||
HWH 1/8" HOSE (02 HOSE) |
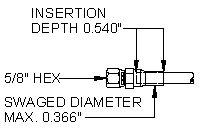 | ||||
|
HOSE END 7/16-20 FM |
DIE |
PUSHER | |||
|
HWH Part Number |
RFH59983 (Qty of 5) |
||||
To order hose use part number R93785 for a 50FT ROLL. | |||||
HWH 3/16″ HOSE (03 HOSE) |
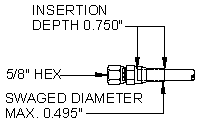 | ||||
|
HOSE END 7/16-20 FM |
DIE |
PUSHER | |||
|
HWH Part Number |
RFH46560 (Qty of 5) |
||||
To order hose use part number R93395 for a 100FT ROLL. | |||||
HWH 1/4" HOSE (04 Hose) |
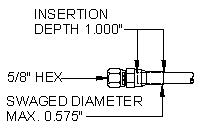 | ||||
|
HOSE END 7/16-20 FM |
DIE |
PUSHER | |||
|
HWH Part Number |
RFH3338 (Qty of 5) |
||||
To order hose use part number R7313 for a 100FT ROLL. | |||||
|
HOSE END 7/16-20 MALE |
DIE |
PUSHER | |||
|
HWH Part Number |
RFH7623 (Qty of 5) |
||||
|
HOSE END 1/2-20 FM |
DIE |
PUSHER | |||
|
HWH Part Number |
RFH43161 (Qty of 5) |
||||
HWH 5/16″ HOSE (05 HOSE) |
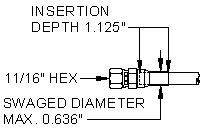 | ||||
HOSE END 1/2-20 FM |
DIE |
PUSHER | |||
HWH Part Number |
RFH4083 (Qty of 5) |
||||
To order hose use part number R6357 for a 100FT ROLL. | |||||
PARKER HOSE: 1/8" Print on hose: "Parker Parflex PDH-2 1/8 6000 PSI WP – USE 58 SERIES FITTINGS"
|
|||
|
DIE |
PUSHER |
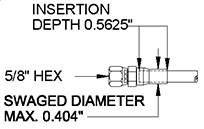 | |
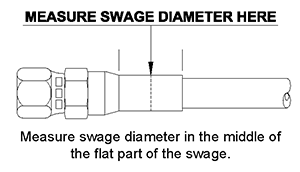
These instructions must be followed carefully to assure quality hose swaging and repair. Failure to follow these instructions will result in swaging failures causing leaks and unnecessary replacement of hoses or hose ends. IMPORTANT: Refer to ML24976 – PAGE 1 & 2 for swaging tool information. DO NOT USE A SWAGING TOOL OR DIE SET THAT IS NOT APPROPRIATELY STAMPED. DO NOT USE A DIE SET WITHOUT THE HWH PART NUMBER STAMP IN A SWAGING TOOL WITH THE HWH PART NUMBER STAMP. IMPORTANT: Before swaging a hose end the swaging equipment should be checked. Look for nicks or dents on the die mating surfaces and where the die seats in the swaging tool. Any deformations in these areas could cause the dies to not fit together properly during the swaging procedure. Check the die for galling in the area that the hose end is pushed into. Any damaged die or swaging tool should be replaced or fixed before being used. Using damaged equipment will result in improperly swaged hose ends and leaks. 1. Refer to the HOSE/FITTINGS/SWAGING GUIDE sheet, number ML24976 – PAGE 1 & 2, for information which is important when making or repairing a hose. HWH uses several styles and sizes of hydraulic hose. It is important to match the correct hose end with the hose being used. Also the Die and Pusher must be matched to the hose and hose end. IMPORTANT: ML24976 (this document) contains measurements for a finished swage. If a hose end is leaking between the fitting and hose, check the swaged diameter. If the swage is within the tolerance given, DO NOT swage on a new end. The complete hose should be replaced. IF SWAGING A NEW END ON A HOSE, IT IS IMPORTANT TO MEASURE THE FINISHED SWAGE TO MAKE SURE IT IS WITHIN THE TOLERANCE GIVEN FOR THAT HOSE END. A dial caliper or electronic digital caliper is best for checking this measurement. If the swage is larger then acceptable, turn the swage 90 degrees from the original swage position (refer to the swage line on the fitting) and reswage the end. If the new swaged end is not within the tolerance, the complete hose should be replaced. |
3. PROPER INSERTION DEPTH MUST BE MAINTAINED. Use a tape measure or ruler to mark the proper insertion depth on the hose. A gray marking pen works best. Refer to ML24976 – PAGE 1 & 2 for proper insertion depths |
|
| |
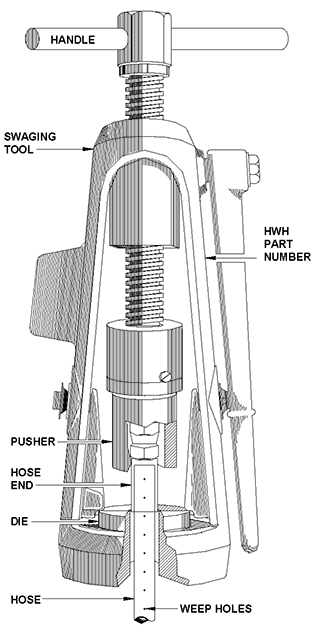
When the swage is complete, the insertion depth mark should be no more than 1/16" from the end of the hose end. If inserted too far or too shallow, the end must be replaced. 4. Make sure the swaging equipment, the new hose end, and the hose are clean. Coat the angular surface of the die set with a very light coat of NEVER-SEEZ before installing the die set into the swaging tool. Coat the outside of the hose end before swaging. The die and hose end will gall if NEVER-SEEZ is not used. If NEVER-SEEZ is not available, use a heavy duty gear lube. 5. Set the dies in the swaging tool and lock in place with the dogs or spring wire keepers. It is OK if the dogs do not fit tightly against the dies. Feed the hose through the die and insert the hose into the hose end. Make sure the mark on the hose is within 1/16" of the hose end. It is allowable to insert the hose with the hose end inserted through the swaging tool bowl and then install the die halves into the swaging tool. NOTE: When repairing a hose with oil in it be careful to not point the hose down into the hose end. This could let oil fill the hose end causing a swaging problem and a leak. 6. Run the pusher down to the hose end. Make sure the hose end is seated in the pusher. Make sure the hose end is not tilted to one side of the pusher. Turn the swaging tool handle until the face of the pusher fully contacts the top face of the dies. Take care that the hose does not pull out of the hose end as the swage is started. This must be checked when the swage is complete. DO NOT USE AN IMPACT WRENCH TO TURN THE SWAGING TOOL. 7. To properly tighten the hose onto a fitting, make the hose end snug (finger tight) on the fitting. Using the proper wrench, tighten the hose end 2 flats (1/3 turn) NO MORE. IMPORTANT: A hose that is repaired due to a hose end leak may have residual oil trapped between the inner core and the outer covering. The outer hose cover has weep holes in it. Any residual oil can seep from these weep holes as the hose is pressurized. This seepage may continue for some time after the repair. It is important to wipe the end of the hose several times and inform the customer of this possibility. THIS IS NOT A LEAKY HOSE END. However, if the hose continuously drips fluid a problem is indicated. | |
|
| |
2. The hose should be cut with a sharp hose or tubing cutter. The cut should be a flat 90 degree cut. Hose cut at an angle may cause leaks. |
|
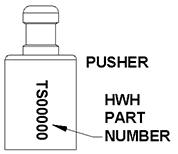
TO ORDER HOSE TOOLS/EQUIPMENT: MR751100_HOSE | TO ORDER HOSE & HOSE ENDS: MR220000 NOTE: Swaging tools, pushers and dies must be marked with HWH Part Numbers. DO NOT use unmarked parts. | |
SWAGING TOOLS NOTE: The TS44701 swaging tool is shown below. The TS52658 swaging tool looks similar but has spring wire keepers instead of dogs to hold the die in place.
|
PUSHERS TS59959 – PUSHER 02 FM TS52707 – PUSHER 03/04 FM TS52707 – PUSHER 03/04 |
| |
DIES TS59960 (TS60241) – SWAG DIE DS02 R 1/8" HP TS51677 (TS46561) – SWAG DIE 303 3/16" TS44675 (TS40269) – SWAG DIE 3W4 1/4" | |
| |


