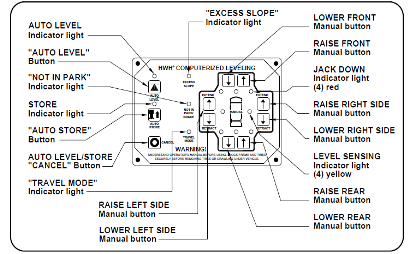
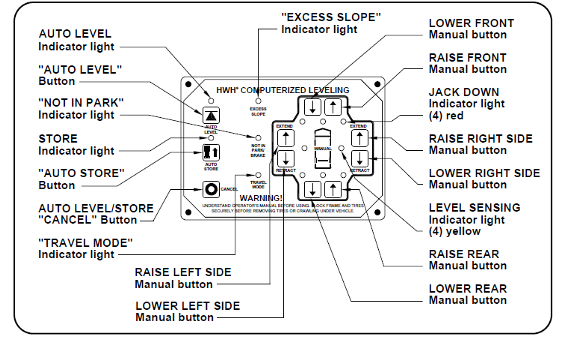
MANUAL TOUCH PANEL OPERATION
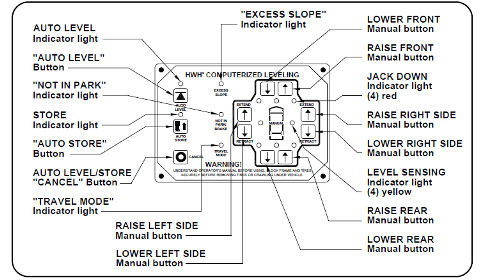
The ignition must be in the “ON” position and the park brake must be set for the system to operate. The manual RAISE (Up Arrow) and LOWER (Down Arrow) buttons will NOT function if the AUTO LEVEL or AUTO STORE lights are flashing. Push the CANCEL button to turn of an AUTO operation light.Make sure all jacks are fully retracted. Use the valve release cams to retract any extended jack. Make sure all valve release cams are closed.
Make sure the park brake is set and turn the ignition to “ACC”. One or two yellow LEVEL SENSING indicator lights may be on. The green TRAVEL MODE indicator light should be on. | |
| Travel Mode might is on. No other panel lights are on. | No touch panel lights are on. |
| Travel Mode light is off. A red Jack Down warning light is on. All jacks are retracted. | More than two yellow Level indicator lights are on |

MANUAL TOUCH PANEL OPERATIONTHE TRAVEL MODE LIGHT IS NOT ON. NO OTHER TOUCH PANEL LIGHTS ARE ON.Push the AUTO STORE button. Does the Store light start to Flash?If the Store light starts to flash, replace the touch panel.
|
| If the Store light does not flash, review Part 4, Section B of the 725 Series Repair Manual ML59932 – Page MI91.328B |
| Return to page 1 |

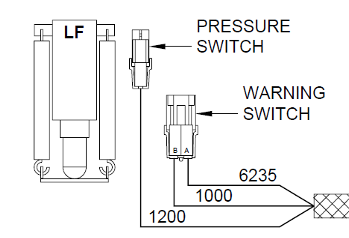
MANUAL TOUCH PANEL OPERATIONALL JACKS ARE FULLY RETRACTED, A RED JACK DOWN LIGHT IS ON
Unplug the jack warning switch for any red indicator light that does not go out. Does that light go out? | |
| The red Jack Down light goes out | The red Jack Down light does not go out |

MANUAL TOUCH PANEL OPERATIONTHE RED JACK DOWN LIGHT GOES OUT WHEN UNPLUGGED
Remove the warning switch from the jack. Plug the switch back into the harness. Hold a magnet against the warning switch.THE RED JACK DOWN LIGHT GOES OUT – Replace the jackTHE RED JACK DOWN LIGHT DOES NOT GO OUT – Replace the warning switch |
| Return to page 1 |
MANUAL TOUCH PANEL OPERATIONTHE RED JACK DOWN LIGHT DOES NOT GO OUT WHEN UNPLUGGED |
| If the red Jack Down light does not go out, review Part 4, Section C of the 725 Series Repair Manual ML59932 – Page MI91.328D |
| Return to page 1 |
MANUAL TOUCH PANEL OPERATIONMORE THAN TWO YELLOW LEVEL INDICATOR LIGHTS OR OPPOSING YELLOW INDICATOR LIGTS ARE ON – I.E. LEFT SIDE AND RIGHT SIDE LIGHTS ARE ON
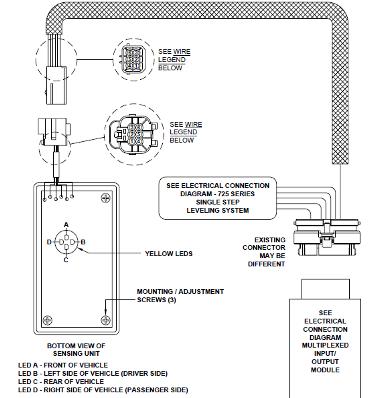
NOTE: There is most likely an extension cable between the sensing unit plug at the MIOM and the sensing unitUnplug the sensing unit cable at the MIOM. Do all the yellow Level indicator lights go out? | |
| One or more Level indicator lights stay on | All of the Level indicator lights go out |
MANUAL TOUCH PANEL OPERATIONONE OR MORE YELLOW LEVEL INDICATOR LIGHTS STAY ONThe issue is most likely the MIOM. Replace the MIOM. |
| Return to page 1 |
MANUAL TOUCH PANEL OPERATIONALL OF THE YELLOW LEVEL INDICATOR LIGHTS GO OUT WITH THE SENSING UNIT CABLE UNPLUGGED FROM THE MIOM
Plug the sensing unit cable back in at the MIOM. Unplug the sensing unit from the sensing unit cable. Do any yellow Level indicator lights come on?YES – The issue is with the sensing unit cable. The cable may be pinched and shorted to ground or the ground wire in the cable may be shorted to another wire in the cable. Fix or replace the cable.NO – Replace the sensing unit. |
| Return to page 1 |

MANUAL TOUCH PANEL OPERATIONWITH THE IGNITION ON AND THE PARK BRAKE SET, THE TRAVEL MODE LIGHT IS ON. NO RED JACK DOWN INDICATOR LIGHTS ARE ON. NO MORE THAN TWO YELLOW LEVEL INDICATOR LIGHTS ARE ON.
It is assumed the jacks are plumbed properly, the jacks extend and retract properly and the red JACK DOWN warning lights are working properly. If there is an issue with the warning lights, go to the beginning of JACK DIAGNOSTICS – STEP 4Check jack operation in the following order:
Repeat the following tests until all four sets of up arrow and down arrow buttons have been checked.Push the up arrow button. The pump should run. The front jacks should start to extend. | ||
| The correct jacks extend | The “NOT IN PARK/BRAKE” light comes on while pushing an up arrow | The pump does not run |
| The wrong jacks extend | Only one or no jacks extend | |
THE CORRECT JACKS EXTENT WHEN THE UP ARROW BUTTON IS PUSHED
Push the down arrow button corresponding to the up arrow button that was pushed. The jacks should retract. Do the jacks retract? | |
| Yes. Repeat page 9 until all four sets of up and down arrows have been tested | No, the jacks do not retract |
| All four sets of up and down arrows have been tested and are working properly | |
THE JACKS EXTEND BUT WILL NOT RETRACT WHEN PUSHING THE DOWN ARROW BUTTONThe issue is most likely the touch panel. Replace the touch panel. | ||
| If replacing the touch panel fixes the issue, repeat page 9 until all four sets of up and down arrows have been tested | All four sets of up and down arrows have been tested and are working properly | If replacing the touch panel does not fix the issue, return to the beginning of JACK DIAGNOSTICS – STEP 5 |
THE “NOT IN PARK/BRAKE” LIGHT COMES ON WHILE PUSHING AN UP ARROW
Make sure the park brake is set.If the park brake is set, check that the #9000 wire is properly connected to the vehicle park brake. Consult the vehicle manufacturer for park brake wiring information.The #9000 wire should have a ground when the park brake is set. With the park brake set, unplug the 35 pin connector at the I/O module and check pin 1 in the harness plug.If a ground is not present, the #9000 wire, the connection for the #9000 wire to the park brake circuit or the park brake switch is the issue. Repair as necessary.If a ground is present, make sure the 9000 wire is securely seated into the 35 pin harness connector. Replace the MIOM if the wire is OK. | |
| Return to page 9 | |

THE PUMP DOES NOT RUN WHEN PUSHING AN UP ARROW. THE “NOT IN PARK/BRAKE” LIGHT DOES NOT COME ON WHILE PUSHING THE BUTTON.It is assumed at this point the Master and Pump relays are good. It is also assumed there is good voltage to the relays and the pump does run with proper pressure. Push the pump run switch and make sure the pump runs. If it does not run, return to “JACK DIAGNOSTICS – STEP TWO”.
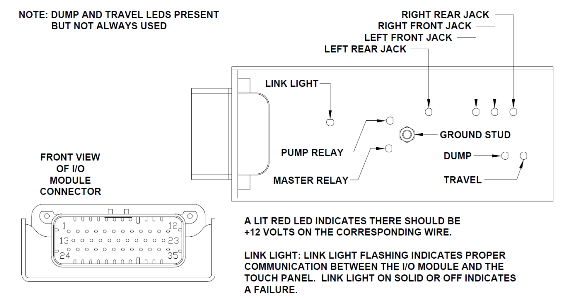
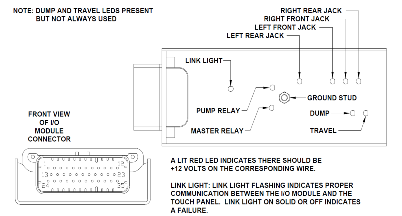
Try pushing a different up arrow button. If the pump runs when pushing any up arrow button, replace the touch panel.If the pump does not run when pushing any up arrow button, check the Master relay LED. With the ignition on, with or without the park brake set, this LED should be lit. | |
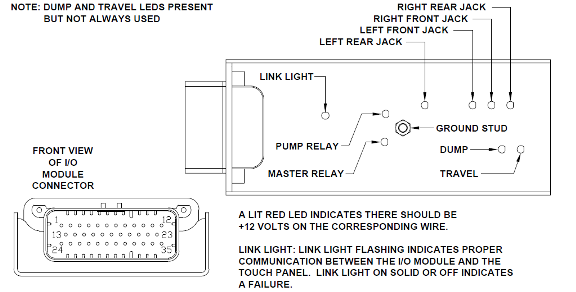
| The Master relay LED is lit | The Master relay is not lit |
THE PUMP DOES NOT RUN WHEN PUSHING AN UP ARROW. THE MASTER RELAY LED ON THE MIOM IS NOT LIT
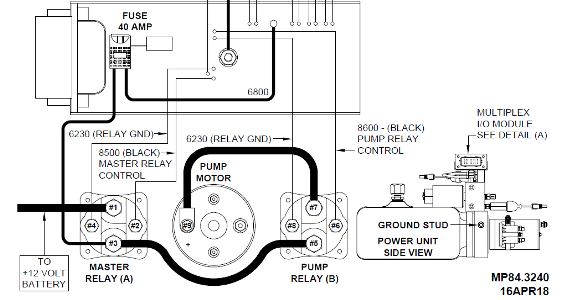
Remove the 8500 wire from terminal #2 of the master rely and unplug the large Amp Seal connector from the MIOM. Wait a few seconds. Make sure the 8500 wire ring terminal is not in contact with a ground. Plug the Amp Seal connector back in.If the master relay LED does not come on, replace the MIOM.If the master relay LED does come on, replace the master relay. | |
| Return to page 9 | |
THE PUMP DOES NOT RUN WHEN PUSHING AN UP ARROW. THE MASTER RELAY LED ON THE MIOM IS LIT
Look for the pump relay LED while pushing an up arrow button | |
| The Pump relay LED is lit | The Pump relay is not lit |

THE PUMP DOES NOT RUN WHEN PUSHING AN UP ARROW. THE PUMP RELAY LED ON THE MIOM IS LIT
Check for a minimum of 10 volts on terminal #6 of the pump relay.If there is less than 10 the issue is the 8600 wire or it’s connection to terminal #6. If the wire and connection is good, replace the MIOM.If there is 10 or more volts on terminal #6, return to “JACK DIAGNOSTICS – STEP 2”. | |
| Return to page 9 | |

THE PUMP DOES NOT RUN WHEN PUSHING AN UP ARROW. THE PUMP RELAY LED ON THE MIOM IS NOT LIT
Check the 40 amp fuse and the black #10 wire from the MIOM to the #3 terminal of the Master relay. If the replace the fuse if blown. Make sure the #10 wire and it’s connection to terminal #3 are good. | |
| If there is an issue with the fuse or wire, repair and return to Page 9 | |
If the 40 amp fuse and the wire are good, remove the 8600 wire from terminal #2 of the master rely and unplug the large Amp Seal connector from the MIOM. Wait a few seconds. Make sure the 8500 wire ring terminal is not in contact with a ground. Plug the Amp Seal connector back in.If the master relay LED does not come on, replace the MIOM. | |
| Return to page 9 | |
THE PUMP RUNS. THE CORRECT JACKS DO NOT EXTEND WHEN AN UP ARROW BUTTON IS PUSHED
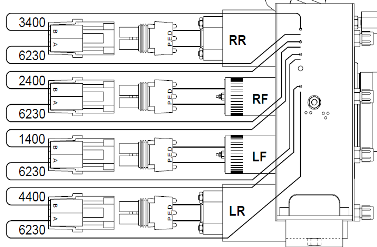
It is assumed the jack plumbing was checked in STEP THREE of JACK DIAGNOSTICS.The jack wires are numbered and also there is a tag close to the Packard connector.The tags are labeled:
| |
| Return to page 9 | |

THE PUMP RUNS. ONE OR MORE JACKS DO NOT EXTEND WHEN AN UP ARROW BUTTON IS PUSHED
Check the red jack LEDS on the MIOM while pushing an Up Arrow button. | |
| Jack LEDs are coming on | Jack LEDs are not coming on |

THE PUMP RUNS. ONE OR MORE JACKS DO NOT EXTEND WHEN AN UP ARROW BUTTON IS PUSHED. JACK LEDS ON THE MIOM ARE NOT COMING ON
If a jack LED is not coming on, unplug the valve and the main MIOM connector. Wait a few seconds and plug only the main MIOM connector back in. Now push the Up Arrow and watch the jack LEDs.If the LED still does not come on, replace the MIOM.If the LED comes on, replace the valve. | |
| Return to page 9 | |
THE PUMP RUNS. ONE OR MORE JACKS DO NOT EXTEND WHEN AN UP ARROW BUTTON IS PUSHED. JACK LEDS ON THE MIOM ARE NOT COMING ON
If the jack LEDs are coming on, check for a minimum of 10 volts between the white and black wire for the valve, valve plugged in, while pushing the Up Arrow button.Note: A test lead is available to do a voltage test with the valves plugged in. TS39641If a minimum of 10 volts is not present, replace the MIOMIf a minimum of 10 volts is present, replace the valve | |
| Return to page 9 | |


IT IS ASSUMED THE SYSTEM IS WORKING WITH THE MANUAL UP AND DOWN ARROWS.LEVEL SENSING UNIT TEST
With the ignition on and the park brake set, one or two yellow level indicator lights may be on | |
| One or two yellow level indicator lights are on | No yellow level indicator lights are on |
ONE OR TWO YELLOW LEVEL INDICATOR LIGHTS ARE ON
A lit yellow level indicator light means that side or end is low. Extend jacks to turn the lights off. With all lights off, the vehicle should be level within the tolerances of the level sensing unit, about an inch side to side and about 4 – 5 inches front to rear.If two yellow level indicator lights are on, always run the side jacks first.Push the appropriate Up Arrow button to extend a jack pair to turn out the lit yellow level indicator light. If two lights are lit, after the side light goes out repeat the process with the lit end light.If the lights go out, check to see if the coach is level. If the vehicle is not level, adjust the level sensing unit according to page MP44.1511 of the 725 repair manual. |
| If the level sensing unit needs adjustment see 725 series Repair Manual ML59932 – Page MP44.1551 |
| If any yellow level indicator light will not go out, proceed to page 24 |
| If the yellow level indicator lights will all go out and the vehicle is level, proceed to STEP 6 of JACK DIAGNOSTICS |

ONE OR MORE YELLOW LEVEL INDICATOR LIGHTS WILL NOT GO OUT
NOTE: There is most likely an extension cable between the sensing unit plug at the MIOM and the sensing unitUnplug the sensing unit cable at the MIOM. Do all the yellow Level indicator lights go out? | |
| One or more Level indicator lights stay on | All of the Level indicator lights go out |
ONE OR MORE YELLOW LEVEL INDICATOR LIGHTS STAY ONThe issue is most likely the MIOM. Replace the MIOM. | |
| Return to page 23 | |
ALL OF THE YELLOW LEVEL INDICATOR LIGHTS GO OUT WITH THE SENSING UNIT CABLE UNPLUGGED FROM THE MIOM
Plug the sensing unit cable back in at the MIOM. Unplug the sensing unit from the sensing unit cable. Do any yellow Level indicator lights come on?YES – The issue is with the sensing unit cable. The cable may be pinched and shorted to ground or the ground wire in the cable may be shorted to another wire in the cable. Fix or replace the cable.NO – Replace the sensing unit. | |
| Return to page 23 | |

NO YELLOW LEVEL INDICATOR LIGHTS ARE ON
A lit yellow level indicator light means that side or end is low. Extend jack pairs, one at a time, to lift the vehicle and turn the opposite level indicator light on.Example. Push the left side Up Arrow button and raise the left side of the vehicle. The right side yellow level indicator light should come on.Push the corresponding down arrow to retract those jacks. The lit level indicator light should go out. Repeat this with all four sets of Up Arrow and Down Arrow buttons. | |
| If any level indicator lights won’t come on or go back out, see Part 8 of the 725 series Repair Manual ML59932 – Page MI84.3174 | |
After checking that all level indicator lights are functioning properly, check to see if the vehicle is level with all level indicator lights out.If the vehicle is not level, use the manual buttons to extend jacks as needed to level the vehicle. | |
| If the level sensing unit needs adjustment see 725 series Repair Manual ML59932 – Page MP44.1551 | |
| If the yellow level indicator lights will all go out and the vehicle is level, proceed to STEP 6 of JACK DIAGNOSTICS | |
